读书《Stage3D Game Programming Beginner》
发表于 2013年7月28日
这篇笔记一年半前读书时发到豆瓣上了,去豆瓣搜过书的应该都看见过,这是我入门3d看的第一本书,现在把原文复制过来简单排版和整理了一下。
第一章,Let's Make a Game Using Molehill
介绍什么是molehil。。略 。此书面针对了解AS3,但不太了解3d的读者。
3d术语:
Mesh:3d游戏中的模型就叫一个mesh。模型一般用3d studiomax 等软件做的,一个场景可以有几百个mesh组成。
Polygon:mesh可以由成百上千的多边形组成,多边形可以是三角形,也可以是四边形,一个3d立方体由6个面片组成,每个面片叫做一个poly。
Vertex:每个poly有3个或以上角,每个角的顶点就是一个vertex。
Texture:想象成墙纸,可以是一个jpg或png的图片。
Shaders:shader是视觉风格的定义,它定义怎样渲染某物,在stage3d中,shaders存在Program3D类中。创建一个shader,需要创建一个vertex program,和一个fragment program 。
Fragment program:在molehill中是处理mesh视觉渲染的一系列命令。也叫像素着色器。fragment programs描述一个给定的表面材质和对光照的反应,不同的材质对光照有不同的反应方式取决于反射和透明度等,需要不同的代码来模拟。每个模型都需要一个fragment program,否则就不会渲染出来,它可以是一个简单的texture,也可以是复杂的2个texture混合外加灯光反射。
Vertex program:molehill常用 vertex program计算mesh的形状,影响每个vertex在3d世界中的位置。这样可以把mesh缩放,扭曲,做变形动画。也可以分配任意数量的数据到mesh中的每个vertex,不只是xyz坐标,可以是rgb颜色uv等。每个模型的渲染都需要个vertex program,可以是简单的在原始位置渲染或复杂到让mesh做变形动画。
Vectors:Vector3D描述空间中的位置,在geom包里
import flash.geom.Vector3D;
var putTheTreeHere:Vector3D = new Vector3D(0,0,0);
var locationOfTreasure:Vector3D = new Vector3D(1000,0,-15000);
Normals:仅用来指明方向,length等于1的单位向量,可以简单的用Vector3D类的normalize()方法获得。
var aNormalPointingUp:Vector3D = new Vector3D(0,1,0);
Matrices:是向量的集合,Matrix3D是4×4的矩阵,用来方便的移动,旋转,缩放对象。
第一章结束,总结
- Vector3D: containing an x, y, and z component
- Normal: a Vector3D that has a length of one
- Matrix: a 4x4 group of vectors with position, rotation,and scale
- Vertex: a point in space that is the corner of a polygon
- Polygon: a shape defined by multiple vertex coordinates
- Mesh: a group of polygons (polies) that make up a model
- Texture: a bitmap image that is like a wallpaper for a mesh
- Vertex program: commands affecting the shape of a mesh
- Fragment program: commands affecting the look of a mesh
第2章,Blueprint of a Molehill
原来为什么慢,因为之前DisplayList全部CPU,molehill为什么快,因为molehill是完全GPU加速的。
Molehill will rely on DirectX 9 on Windows machines and OpenGL 1.3 on both Mac OS-X and Linux. On mobile devices such as tablets, televisions, and phones, Molehill will rely upon OpenGL ES2.
DisplayList在stage3d之上,可以组合stage3d和原始的flash显示列表一起做东东.
Molehill程序结构
stage3d已不在显示列表里,不能addchild了.
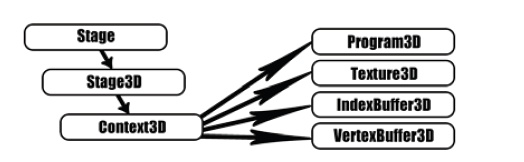
- Context3D:可以想象成"引擎",所有3d数据都要传给他。
This Context3D is the object that you send all your textures, vertex buffers, and
vertex/fragment programs to. The Context3D is the base class that holds all of your game
data and does all the work.
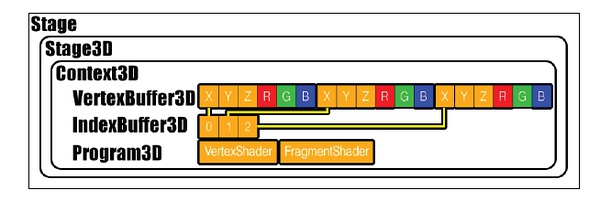
VertexBuffer3D:VertexBuffer3D是一个numbers的数组,用来保存第一章提到的vertex坐标,但不限于顶点坐标,还可以保存rgb,uv等值。初始化游戏的时候要把这个vertexBuffer3D传给Contex3D,之后Contex3D会把这些数据直接传给显卡的RAM或VRAM,渲染时会用。
IndexBuffer3D:由于顶点数据是一大坨VertexBuffer3D,Molehill需要知道每组数据的起始和结束,所以有了index buffer做索引,如下图,表示3个顶点,每个有6个元素 。
- Program3D:Vertex programs和 fragment programs也叫shaders 与前边的buffer同样传给contex3d,他是从一种类似汇编语言编译成的,他们告诉gpu怎样根据上边提供的buffer画mesh。
一个stage3d程序的流程图
分2部分,setup 和 render loop
setup:
所有buffers和programs被编译并发送到显卡。这只做1次。一旦setup,molehill可以在不同位置重复画meshes而不需要其他初始化。
setup详细过程:
- Request a Context3D instance from Stage3D
- Set up the Context3D (telling it how big it is, and so on)
- Create a VertexBuffer (one for each mesh you intend to use)
- Create an IndexBuffer (each will correspond to a VertexBuffer)
- Upload this data to the Context3D (send it to your GPU)
- "Compile" a VertexProgram (turn your shader source code into bytes)
- "Compile" a FragmentProgram (turn your shader source code into bytes)
- Create a Program3D which will use the preceding shaders (can be used by more than one mesh)
这8步一般只需要一次,偶尔由于3d环境丢失的关系需要重新来一次,例如因为计算机睡眠等原因。
render loop:一般是监听ENTER_FRAME事件重复执行的
- Clear the Context3D (erase the old view)
- Tell the Context3D which Program3D to use (for example, a shader that looks
like steel) - Tell the Context3D which VertexBuffer to use (for example, a spaceship)
- Setup data for you your shaders (variables, such as the new location of a spaceship)
- Draw some triangles (tell the Context3D to do some drawing)
- Update the screen with your drawn triangles (show the user the new scene)
总结:这章讲了什么?
- The old fashioned way: 2D Flash using DisplayObjects
- The Molehill way: Stage3Ds containing Context3Ds
- Why Molehill is so fast: Hardware 3D, baby
- Combining 2D and 3D: You can use old and new Flash objects together
- Flowchart of a Molehill game: Setup first, then a render loop
第3章,Fire up the Engines
这章是前边两章内容的一个实例,直接看代码就行了,书里好像也么讲什么新内容,代码倒是注释的很详细
除了shader代码要后边章节详细讲,其他的配合帮助文档应该都看懂了。
详见 Stage3dGame.as类
本章总结:
we learned how to obtain Flash 11 for our browser, we got all the tools ready
to compile Stage3D games, we learned how to initialize the Stage3D API, how to upload
mesh and texture data to the video card, and how to animate a simple 3D scene
第4章,Basic Shaders
AGAL: Adobe Graphics Assembly Language
前边讲过shaders就是vertex program (vertex shaders)和 fragment program(pixel shaders)。
由于他们在gpu中执行,所以很快,每帧可以数百万次,flash的一帧中,mesh中每个顶点都要执行一次vertex program! fragment shade更厉害,每个像素都执行一次!。
agal语句是什么样的
<opcode> <destination> <source 1> <source 2>
agal只有30个opcodes,完整列表在Stage3D的文档里找.
例如 mov v0, va1 把va1的值copy到v0.
常见agal opcode:
mov (copies data from source1 to destination)
add (destination = source1 plus source2)
sub (destination = source1 minus source2)
mul (destination = source1 multiplied by source2)
div (destination = source1 divided by source2)
什么是寄存器 (register)
上边提到的"source" 和 "destinations"叫寄存器,你可以把它们当成变量,存储数据的地方。他们代表显存中的一小块,为速度而优化过的。寄存器都是包含4个128位的浮点数 ,用as3的话说就是4个Number。
寄存器的组成部分:
4个值中的每一个都是一个组成部分,可以通过xyzw或者rgba访问
va1.x和va1.r一样都是寄存器的第一个组成部分。
一般在vertex里用xyzw,fragment里用rgba。
opcode一般四个组件同时运算,例如以add opcode为例 source1是一个 Vector3D (10,100,50,0) 然后source2 是 (5,1,3,0),结果会是(15,101,53,0).
不同的寄存器有不同的功用:
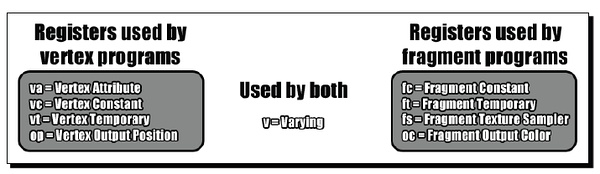
顶点属性寄存器 Vertex Attribute Registers:va0...va7
有8个va寄存器,分别是va0, va1, va2, va3, va4, va5, va6 , va7
只在vertex shader里可用,用来指定VertexBuffer中的位置。可以包含x,y,z,或uv坐标,rgb值等。
用 Context3D:setVertexBufferAt() 来把VertexBuffer分段分配给属性寄存器。然后在shader里用语法 va访问,n就是属性索引。
记住一共有8个寄存器,每个保存4个浮点数,所以每个顶点可以保存32个数字。常量寄存器 Constant registers: vc0..vc127 and fc0..fc27
as中通过Context3D::setProgramConstants()系列函数来设置
在vertex shader中用vc访问,pixel shader中fc 访问
vertex shaders里一共有128个常量寄存器,pixel shaders里有28个常量寄存器。临时寄存器 Temporary registers: vt0..vt7 and ft0..ft7
这些寄存器是用来在shader里临时计算用的,可以当成临时变量。 这样访问:
vt(vertex programs) , ft (fragment programs)
vertex 和pixel shaders各8个临时寄存器。输出寄存器 Output registers: op在vertex shader里用来输出位置,oc在pixel shader里用来输出颜色。 vertex shader的输出就是顶点的clip space 位置,pixel shader输出的就是就是像素颜色。
Varying registers: v0..v7 呃这个不知道中文名了
这些寄存器是用来从vertex shaders向pixel shaders传递数据的。,典型应用是从vertex shader传递顶点颜色或纹理的uv坐标到pixel shader。一共有8个,用v访问。 纹理采样寄存器Texture samplers: fs0..fs7
这8个纹理采样寄存器,只可以用在fragment program里,是用来基于uv坐标从textures里提取颜色的。这个寄存器比较特殊,有它独有的规则
,采样的纹理,需要提前在as中用Context3D::setTextureAt()指定.
shader里语法是这样
fs<n> <flags>
flags是逗号分隔的字符串,类似这样
tex ft1, v0, fs0 <2d,linear,nomip>
关于参数的解释:
texture dimension: 2d, 3d, or cube. A 2D texture is the most commonly used format, a rectangular bitmap. A 3D texture has length, width, and depth, and takes up a lot of texture RAM but is great for 3D materials such as wood, grain, or marble. It is rarely used. A cube texture is a specially encoded group of six rectangular bitmaps and is usually used for reflections, as each of these six images maps to a particular direction like the sides on the inside of a box.
mip mapping: nomip, mipnone, mipnearest, or miplinear. If your texture has mip maps (successively smaller versions of itself, generated to avoid jaggies during rendering), then you can instruct Stage3D to smoothly interpolate the texture using them. Mip mapped textures are very useful to increase render quality and avoid the "moiree effect" (flickering) when viewed from far away.
texture filtering: nearest or linear. If you prefer a retro, then pixilated look you can use nearest here to tell Stage3D not to interpolate the values smoothly, resulting in blocky textures when viewed up close, for example. If you use linear, when zoomed into a texture it will be blurry and will have smoother edges.
texture repeat: repeat, wrap, or clamp. If you want the texture tile properly, then you use repeathere. If you are not tiling the texture and run into problems with edge pixels being the color of the opposite edge (which often happens in transparent billboard particles and when rendering bitmap fonts in 3d), then specify clampto force Stage3D not to blur adjacent edge pixels.
下面开始实例
// the simplest possible vertex program
m44 op, va0, vc0 // pos to clipspace
mov v0, va1 // copy uv
m44是4×4矩阵相乘,顶点坐标存储在 va0 ,乘以mesh相对于camera的位置矩阵vc0
第二行copy va1到v0.
关于vc0后边章节会讲,现在知道他MVP矩阵,这个这本书里没有仔细讲,要看点其他数学书了:(
最简单的fragment program
// a simple fragment program
tex ft1, v0, fs0 <2d,linear,nomip>
mov oc, ft1
从fs0取样到ft1,v0是来自顶点shader的uv坐标
把 ft1输出.
编译 AGAL 代码
var vertexShaderAssembler:AGALMiniAssembler = new AGALMiniAssembler();
vertexShaderAssembler.assemble(
Context3DProgramType.VERTEX,
"m44 op, va0, vc0\n" +
"mov v0, va1"
);
var fragmentShaderAssembler:AGALMiniAssembler = new AGALMiniAssembler();
fragmentShaderAssembler.assemble(
Context3DProgramType.FRAGMENT,
"tex ft1, v0, fs0 <2d,linear, nomip>;\n" +
"mov oc, ft1"
);
var program:Program3D = context3D.createProgram();
program.upload(
vertexShaderAssembler.agalcode,
fragmentShaderAssembler.agalcode
);
渲染!
- Clear the Context3D, erasing the previous frame
- Select which vertex buffers to use
- Select which texture to use
- Set the current shader program
- Apply a matrix for use in your shaders to calculate the location
- Render the mesh
- Repeat steps 2 through 6 for every mesh
- Present the final image to the user
实际代码来了:
// clear your viewport to the background color:
context3D.clear ( 1, 1, 1, 1 );
// vertex position to attribute register 0 (va0)
context3D.setVertexBufferAt (0, vertexbuffer, 0,
Context3DVertexBufferFormat.FLOAT_3);
// uv coordinates to attribute register 1 (va1)
context3D.setVertexBufferAt(1, vertexbuffer, 3,
Context3DVertexBufferFormat.FLOAT_2);
// assign texture to texture sampler 0 (fs0)
context3D.setTextureAt( 0, texture );
// assign shader program
context3D.setProgram( program );
// Note how the two vertex buffer streams,
// vertex positions and uv coordinates,
// get assigned to two different attribute registers.
// The texture is assigned to a specific texture sampler.
// Pass on your transform matrix to the shader.
var m:Matrix3D = new Matrix3D();
m.appendRotation(getTimer()/50, Vector3D.Z_AXIS);
context3D.setProgramConstantsFromMatrix(
Context3DProgramType.VERTEX, 0, m, true);
// The matrix gets stored into constant register 0 here,
// for the Vertex Shader to use.
// To render, call drawTriangles passing in the index buffer.
context3D.drawTriangles(indexBuffer);
// You may do additional drawTriangle calls in the frame
// one for each mesh you want rendered.
// You can use the same or different programs for each meshes.
// Once all meshes have been drawn, display them on screen:
context3D.present();
后边全在分块的讲代码,有点晕,都不知道讲到哪了,其实直接看完整的代码就可以了,注释非常全。要费点精力了,我先略了。
详见 Stage3dGame.as类
第5章,Making Stuff Happen!
面片真是太面了,这章要显示真正的模型了。
.OBJ是模型文件,主流3d软件都应该可以导出这种格式。
还有贴图可以photoshop做,具体怎么做的看不懂,等看完了这本书小弟就准备学习学习3d软件了。
.obj文件格式类似这样
v -0.257 0.191 0.423
vt 0.623 0.227
f 1/1 2/2 3/3
第一行是顶点坐标,第2行是uv坐标,第3行是面的定义,用来产生index buffer,复杂的obj文件会有成百上千行。
理论就在这些。
下边开始主要讲解析obj文件Stage3dObjParser.as类
第一步readClass把embed进来的obj文件转成字符串
private function readClass(f:Class):String
{
    var bytes:ByteArray = new f();
    return bytes.readUTFBytes(bytes.bytesAvailable);
}
然后每行解析
// Split data in to lines and parse all lines.
var lines:Array = definition.split(LINE_FEED);
var loop:uint = lines.length;
for(var i:uint = 0; i < loop; ++i)
    parseLine(lines[i]);
然后根据firstWord分别解析不同数据
private function parseLine(line:String):void
{
        // Split line into words.
        var words:Array = line.split(SPACE);

        // Prepare the data of the line.
        if (words.length > 0)
            var data:Array = words.slice(1);
        else
            return;

        // Check first word and delegate remainder to proper parser.
        var firstWord:String = words[0];
        switch (firstWord)
        {
            case VERTEX:
                parseVertex(data);
                break;
            case NORMAL:
                parseNormal(data);
                break;
            case UV:
                parseUV(data);
                break;
            case INDEX_DATA:
                parseIndex(data);
                break;
        }
}
难点在解析index,这里就略了。
如果软件可以不导出normal,则可以大大减小文件体积,可以用下边函数计算出normal
public function restoreNormals():void
{    // utility function
    _rawNormalsBuffer = _cachedRawNormalsBuffer.concat();
}

public function get3PointNormal(
    p0:Vector3D, p1:Vector3D, p2:Vector3D):Vector3D
{    // utility function
    // calculate the normal from three vectors
    var p0p1:Vector3D = p1.subtract(p0);
    var p0p2:Vector3D = p2.subtract(p0);
    var normal:Vector3D = p0p1.crossProduct(p0p2);
    normal.normalize();
    return normal;
}

public function forceNormals():void
{    // utility function
    // useful for when the OBJ file doesn't have normal data
    // we can calculate it manually by calling this function
    _cachedRawNormalsBuffer = _rawNormalsBuffer.concat();
    var i:uint, index:uint;
    // Translate vertices to vector3d array.
    var loop:uint = _rawPositionsBuffer.length/3;
    var vertices:Vector.<Vector3D> = new Vector.<Vector3D>();
    var vertex:Vector3D;
    for(i = 0; i < loop; ++i)
    {
        index = 3*i;
        vertex = new Vector3D(_rawPositionsBuffer[index],
            _rawPositionsBuffer[index + 1],
            _rawPositionsBuffer[index + 2]);
        vertices.push(vertex);
    }
    // Calculate normals.
    loop = vertices.length;
    var p0:Vector3D, p1:Vector3D, p2:Vector3D, normal:Vector3D;
    _rawNormalsBuffer = new Vector.<Number>();
    for(i = 0; i < loop; i += 3)
    {
        p0 = vertices[i];
        p1 = vertices[i + 1];
        p2 = vertices[i + 2];
        normal = get3PointNormal(p0, p1, p2);
        _rawNormalsBuffer.push(normal.x, normal.y, normal.z);
        _rawNormalsBuffer.push(normal.x, normal.y, normal.z);
        _rawNormalsBuffer.push(normal.x, normal.y, normal.z);
    }
}
至此.OBJ解析部分完成了。
上传Mipmaps代码
public function uploadTextureWithMipmaps(dest:Texture, src:BitmapData):void
{
     var ws:int = src.width;
     var hs:int = src.height;
     var level:int = 0;
     var tmp:BitmapData;
     var transform:Matrix = new Matrix();
     var tmp2:BitmapData;
     tmp = new BitmapData( src.width, src.height, true, 0x00000000);
     while ( ws >= 1 && hs >= 1 )
     {
          tmp.draw(src, transform, null, null, null, true);
          dest.uploadFromBitmapData(tmp, level);
          transform.scale(0.5, 0.5);
          level++;
          ws >>= 1;
          hs >>= 1;
          if (hs && ws)
          {
               tmp.dispose();
               tmp = new BitmapData(ws, hs, true, 0x00000000);
          }
     }
     tmp.dispose();
}
巨型实例,结束本章
package
{
import com.adobe.utils.*;
import flash.display.*;
import flash.display3D.*;
import flash.display3D.textures.*;
import flash.events.*;
import flash.geom.*;
import flash.utils.*;
import flash.text.*;
[SWF(width="640", height="480", frameRate="60", backgroundColor="#FFFFFF")]
public class Stage3dGame extends Sprite
{
// used by the GUI
private var fpsLast:uint = getTimer();
private var fpsTicks:uint = 0;
private var fpsTf:TextField;
private var scoreTf:TextField;
private var score:uint = 0;
// constants used during inits
private const swfWidth:int = 640;
private const swfHeight:int = 480;
// for this demo, ensure ALL textures are 512x512
private const textureSize:int = 512;
// the 3d graphics window on the stage
private var context3D:Context3D;
// the compiled shaders used to render our mesh
private var shaderProgram1:Program3D;
private var shaderProgram2:Program3D;
private var shaderProgram3:Program3D;
private var shaderProgram4:Program3D;
// matrices that affect the mesh location and camera angles
private var projectionmatrix:PerspectiveMatrix3D = new PerspectiveMatrix3D();
private var modelmatrix:Matrix3D = new Matrix3D();
private var viewmatrix:Matrix3D = new Matrix3D();
private var terrainviewmatrix:Matrix3D = new Matrix3D();
private var modelViewProjection:Matrix3D = new Matrix3D();
// a simple frame counter used for animation
private var t:Number = 0;
// a reusable loop counter
private var looptemp:int = 0;
/* TEXTURES: Pure AS3 and Flex version:
 * if you are using Adobe Flash CS5
 * comment out the following: */
[Embed (source = "art/spaceship_texture.jpg")]
private var myTextureBitmap:Class;
private var myTextureData:Bitmap = new myTextureBitmap();
[Embed (source = "art/terrain_texture.jpg")]
private var terrainTextureBitmap:Class;
private var terrainTextureData:Bitmap = new terrainTextureBitmap();
/* TEXTURE: Flash CS5 version:
 * add the jpgs to your library (F11)
 * right click and edit the advanced properties
 * so it is exported for use in Actionscript
 * and call them myTextureBitmap and terrainTextureBitmap
 * if you are using Flex/FlashBuilder/FlashDevelop/FDT
 * comment out the following: */
//private var myBitmapDataObject:myTextureBitmapData =
//    new myTextureBitmapData(textureSize, textureSize);
//private var myTextureData:Bitmap =
//    new Bitmap(myBitmapDataObject);
//private var terrainBitmapDataObject:terrainTextureBitmapData =
//    new terrainTextureBitmapData(textureSize, textureSize);
//private var terrainTextureData:Bitmap =
//    new Bitmap(terrainBitmapDataObject);
// The Stage3d Texture that uses the above myTextureData
private var myTexture:Texture;
private var terrainTexture:Texture;
// The spaceship mesh data
[Embed (source = "art/spaceship.obj", mimeType = "application/octet-stream")]
private var myObjData:Class;
private var myMesh:Stage3dObjParser;
// The terrain mesh data
[Embed (source = "art/terrain.obj", mimeType = "application/octet-stream")]
private var terrainObjData:Class;
private var terrainMesh:Stage3dObjParser;
public function Stage3dGame()
{
    if (stage != null)
        init();
    else
        addEventListener(Event.ADDED_TO_STAGE, init);
}
private function init(e:Event = null):void
{
    if (hasEventListener(Event.ADDED_TO_STAGE))
        removeEventListener(Event.ADDED_TO_STAGE, init);
    stage.scaleMode = StageScaleMode.NO_SCALE;
    stage.align = StageAlign.TOP_LEFT;
    // add some text labels
    initGUI();
    // and request a context3D from Stage3d
    stage.stage3Ds[0].addEventListener(Event.CONTEXT3D_CREATE, onContext3DCreate);
    stage.stage3Ds[0].requestContext3D();
}
private function updateScore():void
{
    // for now, you earn points over time
    score++;
    // padded with zeroes
    if (score < 10) scoreTf.text = 'Score: 00000' + score;
    else if (score < 100) scoreTf.text = 'Score: 0000' + score;
    else if (score < 1000) scoreTf.text = 'Score: 000' + score;
    else if (score < 10000) scoreTf.text = 'Score: 00' + score;
    else if (score < 100000) scoreTf.text = 'Score: 0' + score;
    else scoreTf.text = 'Score: ' + score;
}
private function initGUI():void
{
    // a text format descriptor used by all gui labels
    var myFormat:TextFormat = new TextFormat();
    myFormat.color = 0xFFFFFF;
    myFormat.size = 13;
    // create an FPSCounter that displays the framerate on screen
    fpsTf = new TextField();
    fpsTf.x = 0;
    fpsTf.y = 0;
    fpsTf.selectable = false;
    fpsTf.autoSize = TextFieldAutoSize.LEFT;
    fpsTf.defaultTextFormat = myFormat;
    fpsTf.text = "Initializing Stage3d...";
    addChild(fpsTf);
    // create a score display
    scoreTf = new TextField();
    scoreTf.x = 560;
    scoreTf.y = 0;
    scoreTf.selectable = false;
    scoreTf.autoSize = TextFieldAutoSize.LEFT;
    scoreTf.defaultTextFormat = myFormat;
    scoreTf.text = "000000";
    addChild(scoreTf);
    // add some labels to describe each shader
    var label1:TextField = new TextField();
    label1.x = 100;
    label1.y = 180;
    label1.selectable = false;
    label1.autoSize = TextFieldAutoSize.LEFT;
    label1.defaultTextFormat = myFormat;
    label1.text = "Shader 1: Textured";
    addChild(label1);
    var label2:TextField = new TextField();
    label2.x = 400;
    label2.y = 180;
    label2.selectable = false;
    label2.autoSize = TextFieldAutoSize.LEFT;
    label2.defaultTextFormat = myFormat;
    label2.text = "Shader 2: Vertex RGB";
    addChild(label2);
    var label3:TextField = new TextField();
    label3.x = 80;
    label3.y = 440;
    label3.selectable = false;
    label3.autoSize = TextFieldAutoSize.LEFT;
    label3.defaultTextFormat = myFormat;
    label3.text = "Shader 3: Vertex RGB + Textured";
    addChild(label3);
    var label4:TextField = new TextField();
    label4.x = 340;
    label4.y = 440;
    label4.selectable = false;
    label4.autoSize = TextFieldAutoSize.LEFT;
    label4.defaultTextFormat = myFormat;
    label4.text = "Shader 4: Textured + setProgramConstants";
    addChild(label4);
}
public function uploadTextureWithMipmaps(dest:Texture, src:BitmapData):void
{
     var ws:int = src.width;
     var hs:int = src.height;
     var level:int = 0;
     var tmp:BitmapData;
     var transform:Matrix = new Matrix();
     var tmp2:BitmapData;
     tmp = new BitmapData( src.width, src.height, true, 0x00000000);
     while ( ws >= 1 && hs >= 1 )
     {
          tmp.draw(src, transform, null, null, null, true);
          dest.uploadFromBitmapData(tmp, level);
          transform.scale(0.5, 0.5);
          level++;
          ws >>= 1;
          hs >>= 1;
          if (hs && ws)
          {
               tmp.dispose();
               tmp = new BitmapData(ws, hs, true, 0x00000000);
          }
     }
     tmp.dispose();
}
private function onContext3DCreate(event:Event):void
{
    // Remove existing frame handler. Note that a context
    // loss can occur at any time which will force you
    // to recreate all objects we create here.
    // A context loss occurs for instance if you hit
    // CTRL-ALT-DELETE on Windows.
    // It takes a while before a new context is available
    // hence removing the enterFrame handler is important!
    if (hasEventListener(Event.ENTER_FRAME))
        removeEventListener(Event.ENTER_FRAME,enterFrame);
    // Obtain the current context
    var t:Stage3D = event.target as Stage3D;
    context3D = t.context3D;
    if (context3D == null)
    {
        // Currently no 3d context is available (error!)
        return;
    }
    // Disabling error checking will drastically improve performance.
    // If set to true, Flash sends helpful error messages regarding
    // AGAL compilation errors, uninitialized program constants, etc.
    context3D.enableErrorChecking = true;
    // Initialize our mesh data
    initData();
    // The 3d back buffer size is in pixels (2=antialiased)
    context3D.configureBackBuffer(swfWidth, swfHeight, 2, true);
    // assemble all the shaders we need
    initShaders();
    myTexture = context3D.createTexture(textureSize, textureSize, Context3DTextureFormat.BGRA, false);
    uploadTextureWithMipmaps(myTexture, myTextureData.bitmapData);
    terrainTexture = context3D.createTexture(textureSize, textureSize, Context3DTextureFormat.BGRA, false);
    uploadTextureWithMipmaps(terrainTexture, terrainTextureData.bitmapData);
    // create projection matrix for our 3D scene
    projectionmatrix.identity();
    // 45 degrees FOV, 640/480 aspect ratio, 0.1=near, 100=far
    projectionmatrix.perspectiveFieldOfViewRH(45.0, swfWidth / swfHeight, 0.01, 5000.0);
    // create a matrix that defines the camera location
    viewmatrix.identity();
    // move the camera back a little so we can see the mesh
    viewmatrix.appendTranslation(0,0,-3);
    // tilt the terrain a little so it is coming towards us
    terrainviewmatrix.identity();
    terrainviewmatrix.appendRotation(-60,Vector3D.X_AXIS);
    // start the render loop!
    addEventListener(Event.ENTER_FRAME,enterFrame);
}
// create four different shaders
private function initShaders():void
{
    // A simple vertex shader which does a 3D transformation
    // for simplicity, it is used by all four shaders
    var vertexShaderAssembler:AGALMiniAssembler = new AGALMiniAssembler();
    vertexShaderAssembler.assemble
    (
        Context3DProgramType.VERTEX,
        // 4x4 matrix multiply to get camera angle
        "m44 op, va0, vc0\n" +
        // tell fragment shader about XYZ
        "mov v0, va0\n" +
        // tell fragment shader about UV
        "mov v1, va1\n" +
        // tell fragment shader about RGBA
        "mov v2, va2\n"
    );
    // textured using UV coordinates
    var fragmentShaderAssembler1:AGALMiniAssembler = new AGALMiniAssembler();
    fragmentShaderAssembler1.assemble
    (
        Context3DProgramType.FRAGMENT,
        // grab the texture color from texture 0
        // and uv coordinates from varying register 1
        // and store the interpolated value in ft0
        "tex ft0, v1, fs0 <2d,linear,repeat,miplinear>\n"+
        // move this value to the output color
        "mov oc, ft0\n"
    );
    // no texture, RGBA from the vertex buffer data
    var fragmentShaderAssembler2:AGALMiniAssembler = new AGALMiniAssembler();
    fragmentShaderAssembler2.assemble
    (
        Context3DProgramType.FRAGMENT,
        // grab the color from the v2 register
        // which was set in the vertex program
        "sub ft0, v2, fc1\n" + ///这句应该删掉?
        "mov oc, v2\n"
    );
    // textured using UV coordinates AND colored by vertex RGB
    var fragmentShaderAssembler3:AGALMiniAssembler = new AGALMiniAssembler();
    fragmentShaderAssembler3.assemble
    (
        Context3DProgramType.FRAGMENT,
        // grab the texture color from texture 0
        // and uv coordinates from varying register 1
        "tex ft0, v1, fs0 <2d,linear,repeat,miplinear>\n" +
        // multiply by the value stored in v2 (the vertex rgb)
        "mul ft1, v2, ft0\n" +
        // move this value to the output color
        "mov oc, ft1\n"
    );
    // textured using UV coordinates and
    // tinted using a fragment constant
    var fragmentShaderAssembler4:AGALMiniAssembler = new AGALMiniAssembler();
    fragmentShaderAssembler4.assemble
    (
        Context3DProgramType.FRAGMENT,
        // grab the texture color from texture 0
        // and uv coordinates from varying register 1
        "tex ft0, v1, fs0 <2d,linear,repeat,miplinear>\n" +
        // multiply by the value stored in fc0
        "mul ft1, fc0, ft0\n" +
        // move this value to the output color
        "mov oc, ft1\n"
    );
    // combine shaders into a program which we then upload to the GPU
    shaderProgram1 = context3D.createProgram();
    shaderProgram1.upload(vertexShaderAssembler.agalcode, fragmentShaderAssembler1.agalcode);
    shaderProgram2 = context3D.createProgram();
    shaderProgram2.upload(vertexShaderAssembler.agalcode, fragmentShaderAssembler2.agalcode);
    shaderProgram3 = context3D.createProgram();
    shaderProgram3.upload(vertexShaderAssembler.agalcode, fragmentShaderAssembler3.agalcode);
    shaderProgram4 = context3D.createProgram();
    shaderProgram4.upload(vertexShaderAssembler.agalcode, fragmentShaderAssembler4.agalcode);
}
private function initData():void
{
    // parse the OBJ file and create buffers
    myMesh = new Stage3dObjParser(myObjData, context3D, 1, true, true);
    // parse the terrain mesh as well
    terrainMesh = new Stage3dObjParser(terrainObjData, context3D, 1, true, true);
}
private function renderTerrain():void
{
    context3D.setTextureAt(0, terrainTexture);
    // simple textured shader
    context3D.setProgram ( shaderProgram1 );
    // position
    context3D.setVertexBufferAt(0, terrainMesh.positionsBuffer,
        0, Context3DVertexBufferFormat.FLOAT_3);
    // tex coord
    context3D.setVertexBufferAt(1, terrainMesh.uvBuffer,
        0, Context3DVertexBufferFormat.FLOAT_2);
    // vertex rgba
    context3D.setVertexBufferAt(2, terrainMesh.colorsBuffer,
        0, Context3DVertexBufferFormat.FLOAT_4);
    // set up camera angle
    modelmatrix.identity();
    // make the terrain face the right way
    modelmatrix.appendRotation( -90, Vector3D.Y_AXIS);
    // slowly move the terrain around
    modelmatrix.appendTranslation(
        Math.cos(t/300)*1000,Math.cos(t/200)*1000 + 500,-130);
    // clear the matrix and append new angles
    modelViewProjection.identity();
    modelViewProjection.append(modelmatrix);
    modelViewProjection.append(terrainviewmatrix);
    modelViewProjection.append(projectionmatrix);
    // pass our matrix data to the shader program
    context3D.setProgramConstantsFromMatrix(
        Context3DProgramType.VERTEX,
        0, modelViewProjection, true );
    context3D.drawTriangles(terrainMesh.indexBuffer,
        0, terrainMesh.indexBufferCount);
}
private function enterFrame(e:Event):void
{
    // clear scene before rendering is mandatory
    context3D.clear(0,0,0);
    // move or rotate more each frame
    t += 2.0;
    // scroll and render the terrain once
    renderTerrain();
    // how far apart each of the 4 spaceships is
    var dist:Number = 0.8;
    // loop through each mesh we want to draw
    for (looptemp = 0; looptemp < 4; looptemp++)
    {
        // clear the transformation matrix to 0,0,0
        modelmatrix.identity();
        // each mesh has a different texture,
        // shader, position and spin speed
        switch(looptemp)
        {
            case 0:
                context3D.setTextureAt(0, myTexture);
                context3D.setProgram ( shaderProgram1 );
                modelmatrix.appendRotation(t*0.7, Vector3D.Y_AXIS);
                modelmatrix.appendRotation(t*0.6, Vector3D.X_AXIS);
                modelmatrix.appendRotation(t*1.0, Vector3D.Y_AXIS);
                modelmatrix.appendTranslation(-dist, dist, 0);
                break;
            case 1:
                context3D.setTextureAt(0, null);
                context3D.setProgram ( shaderProgram2 );
                modelmatrix.appendRotation(t*-0.2, Vector3D.Y_AXIS);
                modelmatrix.appendRotation(t*0.4, Vector3D.X_AXIS);
                modelmatrix.appendRotation(t*0.7, Vector3D.Y_AXIS);
                modelmatrix.appendTranslation(dist, dist, 0);
                break;
            case 2:
                context3D.setTextureAt(0, myTexture);
                context3D.setProgram ( shaderProgram3 );
                modelmatrix.appendRotation(t*1.0, Vector3D.Y_AXIS);
                modelmatrix.appendRotation(t*-0.2, Vector3D.X_AXIS);
                modelmatrix.appendRotation(t*0.3, Vector3D.Y_AXIS);
                modelmatrix.appendTranslation(-dist, -dist, 0);
                break;
            case 3:
                context3D.setProgramConstantsFromVector(
                    Context3DProgramType.FRAGMENT, 0, Vector.<Number>
                    ([ 1, Math.abs(Math.cos(t/50)), 0, 1 ]) );
                context3D.setTextureAt(0, myTexture);
                context3D.setProgram ( shaderProgram4 );
                modelmatrix.appendRotation(t*0.3, Vector3D.Y_AXIS);
                modelmatrix.appendRotation(t*0.3, Vector3D.X_AXIS);
                modelmatrix.appendRotation(t*-0.3, Vector3D.Y_AXIS);
                modelmatrix.appendTranslation(dist, -dist, 0);
                break;
        }
        // clear the matrix and append new angles
        modelViewProjection.identity();
        modelViewProjection.append(modelmatrix);
        modelViewProjection.append(viewmatrix);
        modelViewProjection.append(projectionmatrix);
        // pass our matrix data to the shader program
        context3D.setProgramConstantsFromMatrix(
            Context3DProgramType.VERTEX,
            0, modelViewProjection, true );
        // draw a spaceship mesh
        // position
        context3D.setVertexBufferAt(0, myMesh.positionsBuffer,
            0, Context3DVertexBufferFormat.FLOAT_3);
        // tex coord
        context3D.setVertexBufferAt(1, myMesh.uvBuffer,
            0, Context3DVertexBufferFormat.FLOAT_2);
        // vertex rgba
        context3D.setVertexBufferAt(2, myMesh.colorsBuffer,
            0, Context3DVertexBufferFormat.FLOAT_4);
        // render it
        context3D.drawTriangles(myMesh.indexBuffer,
            0, myMesh.indexBufferCount);
    }
    // present/flip back buffer
    // now that all meshes have been drawn
    context3D.present();
    // update the FPS display
    fpsTicks++;
    var now:uint = getTimer();
    var delta:uint = now - fpsLast;
    // only update the display once a second
    if (delta >= 1000)
    {
        var fps:Number = fpsTicks / delta * 1000;
        fpsTf.text = fps.toFixed(1) + " fps";
        fpsTicks = 0;
        fpsLast = now;
    }
    // update the rest of the GUI
    updateScore();
}
} // end of class
} // end of package
第6章,Textures: Making Things Look Pretty
贴图必须满足2次方
textures must have a length and width that fall into these values: 2,4,8,16,32,64,128,256,512,1024 and so on.
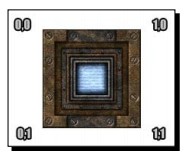
UV坐标
The coordinate U is the left-right axis in a texture, while V represents the up-down axis. Therefore, the bottom of a texture has V of 1 and the far right would have U of 1.
透明Textures
You can also use a .PNG file, complete with variable transparency.
Animating UVs
例如水的特效,可以让uv不断增加一点点,然后uv_offsets传到shader里
// increment the x axis of a vector3D
uv_offsets.x += 0.01;
// send this vector to the AGAL variable vc4
context3D.setProgramConstantsFromVector(Context3DProgramType.VERTEX,4, uv_offsets, true );
在shader里把uv做加法
add v1, va1, vc4
Texture Atlases
A great technique to increase your game's framerate and allow more meshes to be rendered
using the same shader is to pack multiple textures into a large bitmap called a texture atlas.
是提升效率的很重要手段,因为可以把很多不同贴图的模型,放在一次draw call 里。
Using texture atlases is definitely the best practice for rendering fonts in your 3D world .
Animated Textures
第一种方法:in your render loop you could switch the texture you send to context3D.setTextureAt() every few frames.
第2种方法:simple send a new offset in a setProgramConstantsFromVector() call to shift the texture coordinates over to the next frame
显然第一种方法是很慢很蠢的。
Manipulating Texture Data
可以每帧调用uploadFromBitmapData(),但这样效率是很低的,要避免这么做。
如果决定非要这么做了的话,还可以给bitmapdata加滤镜Anything AS3 code you have around that can generate bitmapdata can be used to as the source pixels for your textures。
Render States:Blend modes, backface culling, depth testing
Backface Culling
默认情况下,效率关系只显示mesh可以看见的那一面。如果想两面都显示要这样不做背面裁剪
context3D.setCulling(Context3DTriangleFace.NONE);
可选的参数包括
Context3DTriangleFace.NONE (不裁剪),
Context3DTriangleFace.BACK (默认情况,背面被裁剪),
Context3DTriangleFace.FRONT (与正常情况相反,正面被裁减)
Context3DTriangleFace.BOTH (没什么用,全裁剪,不渲染任何东西).
Depth Testing
stage3d在每个在屏幕上的像素都保存一个深度值叫做zbuffer,默认molehill只渲染离camera近的像素,但当你不想为某个mesh保存深度信息(比如爆炸特效或者透明区域例如窗户)就要设置 setDepthTest()
For example, if you are going to render a transparent mesh like a window that you don't want to draw on the zbuffer (so that other objects are always visible behind it) but you DO want it to be obscured by furniture in the room that is in front of it, simply use:
context3D.setDepthTest(false, Context3DCompareMode.LESS);
第1个boolean值为true表示下一个要渲染的mesh写入depth buffer,反之不写入。
第2个参数可以是
 Context3DCompareMode.ALWAYS
 Context3DCompareMode.EQUAL
 Context3DCompareMode.GREATER
 Context3DCompareMode.GREATER_EQUAL
 Context3DCompareMode.LESS
 Context3DCompareMode.LESS_EQUAL
 Context3DCompareMode.NEVER
 Context3DCompareMode.NOT_EQUAL
The pixel in question will only be rendered when a comparison between it and the
destination pixel are TRUE based on the preceding criteria. The default in Stage3D is to only
render pixels that have a depth value that is LESS than what is already on the screen, closer
to the camera.
The preceding example is handy if you are going to render a transparent mesh like a window
that you don't want to draw on the zbuffer (so that other objects are always visible behind
it), but you DO want it to be obscured by furniture in the room that is in front of it.
Like with other render states, this will be in effect until you set it to something else. You only
need to call it once and that criteria will be used until you instruct Flash otherwise.
Blend Modes
混合模式影响如何渲染texture
在画mesh之前调用Context3D.setBlendFactors(),传递两个乘数给flash,告诉molehill用什么颜色渲染texture。
可选参数:
Context3DBlendFactor.DESTINATION_ALPHA
Context3DBlendFactor.DESTINATION_COLOR
Context3DBlendFactor.ONE
Context3DBlendFactor.ONE_MINUS_DESTINATION_ALPHA
Context3DBlendFactor.ONE_MINUS_DESTINATION_COLOR
Context3DBlendFactor.ONE_MINUS_SOURCE_ALPHA
Context3DBlendFactor.ONE_MINUS_SOURCE_COLOR
Context3DBlendFactor.SOURCE_ALPHA
Context3DBlendFactor.SOURCE_COLOR
Context3DBlendFactor.ZERO
渲染公式: framebuffercolor = (fragmentcolor srcBlend) + (framebuffercolor destBlend).
这是stage3d默认参数,完全不透明
// this is the Molehill default: nice for opaque textures
// all of the color on screen comes from the fragment color
context3D.setBlendFactors(Context3DBlendFactor.ONE,Context3DBlendFactor.ZERO);
常见的使用透明贴图的方法:
// this is the proper setting to use .png textures
// that have transparent regions
// perfect for foliage/fences/fonts
context3D.setBlendFactors(
Context3DBlendFactor.SOURCE_ALPHA,
Context3DBlendFactor.ONE_MINUS_SOURCE_ALPHA);
加亮:
// this setting makes it lighten the scene only
// good for particles stored as .jpg
// (only white sections add to the screen - black is not drawn)
context3D.setBlendFactors(
Context3DBlendFactor.SOURCE_COLOR,
Context3DBlendFactor.ONE);
Blend modes, backface culling, and depth testing are all render states, meaning that you
only have to set them once and that behavior continues to be in effect until you set it to
something else.
效率:
不透明的jpg贴图效率更高,避免overdraw,看不到的不draw,多用zbuffer,从近到远的顺序draw,避免statechange(backface culling ,depth testing,blendmodes),尽量短的shader,越少mesh越好,组合mesh让drawTriangles()调用次数越少越好,只渲染实际可见的mesh(这就要用到PVS算法,quad-trees, BSP trees, and portals了)
最后做了demo,具体看Stage3dGame.as代码了
本章总结
In this chapter, we focused primarily upon three functions that affect how your meshes are
rendered: setBlendFactors, setCulling, and setDepthTest. Creative use of these
special render states open your game world up to all sorts of special effects.
In implementing this new functionality, we achieved a few milestones. Our game engine is
now using multiple textures and several meshes; we have code for rendering textures using
new blend modes which allow us to render special effects such as explosions and smoke.
We can change whether backfaces are culled on meshes, so that we can draw the insides of
transparent objects, we can ignore or use the zbuffer as desired, and we are now detecting
key presses for user control of the action.
第7章,Timers, Inputs, and Entities: Gameplay Goodness!
前边介绍了两个3d不相关的类
GameTimer
GameInput
后面抽象出了一个Stage3dEntity基类.
介绍了一个技巧就是设置dirty flag,然后下一帧渲染的时候一起更新transform矩阵。
其他很多数学方法并没有详细介绍原理。
本章总结
- We now have a class that measures time for use in animations
- We also have a new class that detects the player keyboard and mouse input
- We created a game entity class for use by all in-game objects
- We programmed a simple chase camera with mouse-look
- We upgraded our game to include a heads-up-display overlay and many new in-game models and effects
第8章,Eye-Candy Aplenty
粒子是两个mesh型变做法不是很通用的粒子做法,可用性不高,略了,不过这种做法用AGAL做顶点动画的部分还是值得看一下的。
第9章,A World Filled with Action
深入到游戏细节了,已经没有stage3d的内容了,碰撞检测和可视过滤都是算圆形距离的,不够深入。还有些ui什么的参杂在里边,代码细节太多实在没心情仔细看了。
第10章,Chapter 10: 3... 2... 1... ACTION!
貌似是重构一些代码? 都是游戏逻辑,没有stage3d内容了,我就没看了。
总结
书还不错,我确实入门了,遗憾是数学部分没有专门讲解, 如果有本续集,深度一些就好了。
本文采用 署名-禁止演绎 4.0 国际许可协议 (CC BY-ND 4.0) 进行许可(保留链接可任意转载,禁止修改)。留言系统需要代理访问